Flow Designer
Overview
The Flow Designer is the tool in which flows are built.
The Flow Designer provides a space where you can lay out a series of tasks in sequence, each of which are bound to a form that is to be reviewed or filled out by the end user performing the task.
Task property text fields can be dynamically set using curly braces, {fieldName}, to reference form field values from previous steps in the flow.
Using hidden fields and form rules, you can create complex logic to control how the flow progresses.
After making changes to the flow, apply them by clicking the Save button in the upper right corner of the Flow Designer.
Note
Saved changes only apply to new instances of the flow. Existing tasks in progress will continue to use the previous version of the flow.
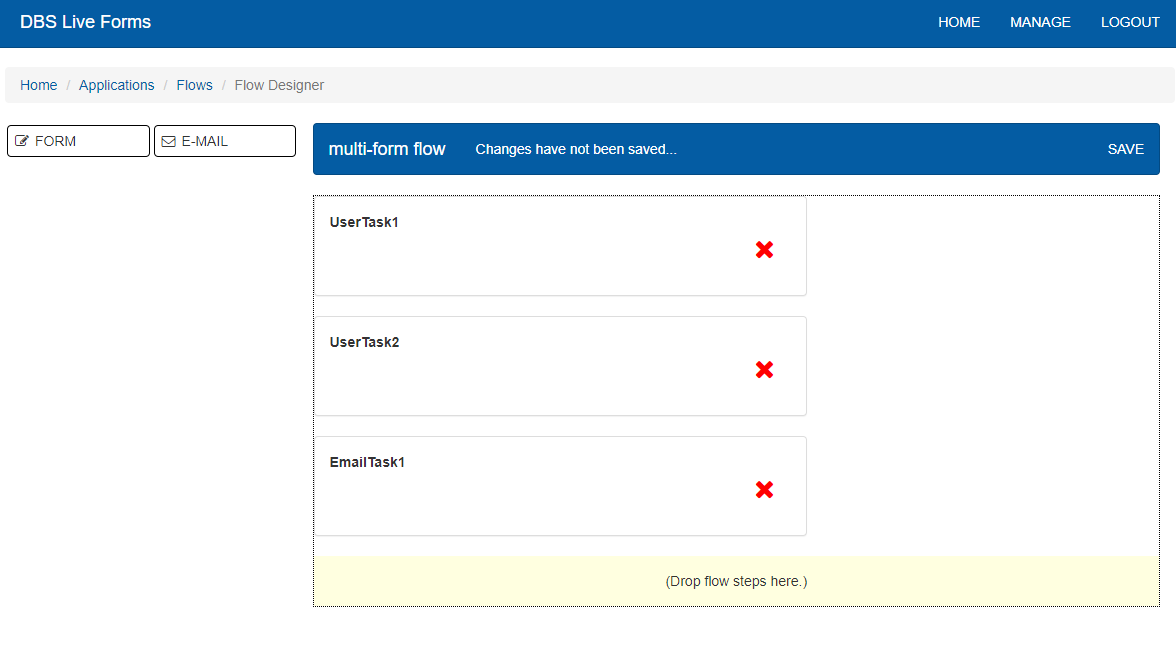
There are two types of tasks available, e-mail and form.
Shared Properties
The following are properties shared by all flow tasks.
ID
This is the unique name given to the task in a flow. It is also the value used for specifying when Actions will be triggered.
Name
This is a label or display name for the task seen on the flow designer.
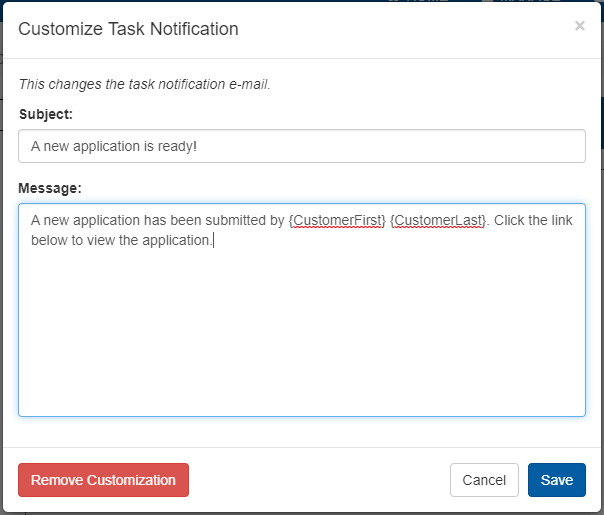
Task Notifications
When tasks are processed through the workflow, a notification is sent to any assigned users who also have their notifications enabled. To customize the notification email, you can customize it in the form task’s properties. Email tasks will share the notification message from the next form task in the flow. Just like with form email actions, form data can be put in the email by using the field name inside curly braces. You can revert to the original default message by clicking the Remove Customization button
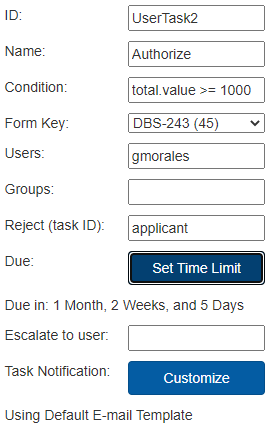
Condition
The “Condition” property provides support for skip logic. When a condition has been set for a particular step in a workflow, that condition will be evaluated when the workflow reaches that step. If the evaluation result is “true” then the workflow will follow through with that step. If the result is “false” then it will skip that step completely and proceed to the next (or end the workflow if this was the last step).
Conditions use Unified Expression Language (UEL) to evaluate conditions. This uses a similar syntax as the form rules, but is not the same. For example, if we only wanted to execute a particular step of the workflow if a form control named “ApprovalRequired” on a previous step was set to “Yes” then the following conditional statement could be used for this property:
ApprovalRequired.value == "Yes"
Other logical operators such as those listed below can be used as well.
Operator |
Description |
|---|---|
== |
Equal |
!= |
Not equal |
> |
Greater than |
>= |
Greater than or equal |
< |
Less than |
<= |
Less than or equal |
&& |
And |
|| |
Or |
! |
Not |
The “And” and “Or” operators allow for complex expressions containing multiple conditions. For example:
InvoiceTotal.value > 5000 || PastDue.value == "Yes"
Controls used in conditions must have been interacted with in a previous step of the flow. Otherwise, the flow will have a submission error when it reaches the step with the condition. Some ways to avoid this issue include using a default value for the control, or using a form rule to set the control value as “”.
E-Mail
The email task sends a link to a specified email address. The email will contain a link which takes the user to the next step of the flow.
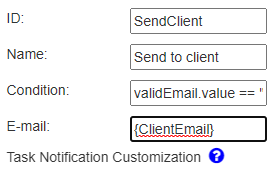
This task has the unique property E-mail which specifies to which address the email will be sent.
The email can either be a specific address, or it can be set dynamically by using a form’s field value at a previous step in the flow.
To use a field value, put the control name inside curly braces, as seen in the example of email task properties above.
Form
Form tasks are used to add data to the workflow. The properties allow further control and logic for how the flow should progress. Any form within the same application as the flow can be used in the task, and will appear in the Form Key dropdown.
Additionally, values from a previous form will carry across the flow. A simple example is when the same form is used in two steps. The form in the second step looks the same as the form in the first step.
Flows also allow values to carry forward through different forms. If a control has the same name as a control from a previous step, it will copy that value.
When a form control has its properties modified by a rule, such as visible and disabled, the state will persist to the next flow steps.
Note
Take care to give controls unique IDs, even in different forms, if you don’t want them to share the same value when used in a flow.
Below are some descriptions of each unique property for this task.
Form Key
This dropdown contains a list of all forms from the same application. Selecting one will set that form to be used for the current step.
Users
Any usernames listed here will be given this flow step in their task list when the previous step is completed. Usernames can be typed, or they can come from a form field by using the field name inside curly braces. Existing users in the system will be suggested as you type.
Groups
Similar to the Users field, any role names put here let its members receive this step of the flow as a task when the previous step is completed. All group members will have access to the same form, so one user may start and save the form and another may open and finish the form afterward. Group names can be typed, or they can come from a form field by using the field name inside curly braces. Existing groups in the system will be suggested as you type.
Reject
Rejecting allows users to send the flow to the task ID specified in the Reject field.
When rejecting, users will be asked to provide a reason for the rejection.
Form rules and actions can use _data.rejectionMessage to access the reason for the rejection.
Using form field values in curly braces, {fieldName}, allows the flow to be sent back to a dynamic task ID.
Due
This is property specifies when a task should be completed by. A form not completed within this time period will be sent to the user specified in the “Escalate to” field. This timer starts once task is generated. To create a due date, click on the Set Time Limit button. In the modal that pops up, you can enter numbers into the fields to specify when the task should be due. Click Save to set the task’s due date, Close to cancel any changes, or Clear to remove the timer.
Escalate To
When the flow step is past its due date, the task is reassigned to the user specified here.
The escalation task copies the task properties of the original task, though the escalation user has full authority over it. The rejection property can be used to send the task back the original assignees.
Flow Options
General flow options currently includes Classifiers, which allows for form values to be displayed from the submission or task lists. Form field names at any step of the flow can be used here. Up to three classifiers are allowed.