Rules
Overview
LiveForms allows the use of JavaScript to further enhance the features of your forms. Working with control properties can allow more control over security, better data validation, and access to more resources.
Interface
On opening the rules editor form the form designer, you will be met with the interface below. Click New Rule to start creating a rule. If the Rules Assistant is enabled you will also be able to send prompts to have rules generated for you.
Rule Assistant
The rule assistant is a tool that can help you generate rules based on your needs. Simply ask a prompt in the text area, and the click the  Generate Rule button. The assistant will then generate a rule based on your prompt, which you can then edit as needed. If the prompt resulted in multiple potential rules, the arrows at the bottom left allow you to cycle through the different options.
The assistant knows the available controls on the form, and their ID. In many cases, it can figure out which control you are referring in the prompt, provided the names are descriptive.
Generate Rule button. The assistant will then generate a rule based on your prompt, which you can then edit as needed. If the prompt resulted in multiple potential rules, the arrows at the bottom left allow you to cycle through the different options.
The assistant knows the available controls on the form, and their ID. In many cases, it can figure out which control you are referring in the prompt, provided the names are descriptive.
After generating a rule, the editor will show what the prompt was, the suggested condition to trigger the rule, the target for the trigger, and rule code. You can then edit the rule code as needed. The text area can be resized from the bottom right corner to make viewing and editing easier. While editing the rule, the navigation arrows will be hidden to avoid obstructing the view. Click off of the text area to show them again. To add the rule in the text area to the form, click the “Add Rule” button.
The AI model used can be customized by administrators in the system configuration.
Rules
Rules are listed in order of creation date, and each listing has a description, condition, target, and a code editor. Click New Rule to add a blank rule to the list.
Descriptions are labels, which have no functional effect and are used to help summarize to users what the rule does.
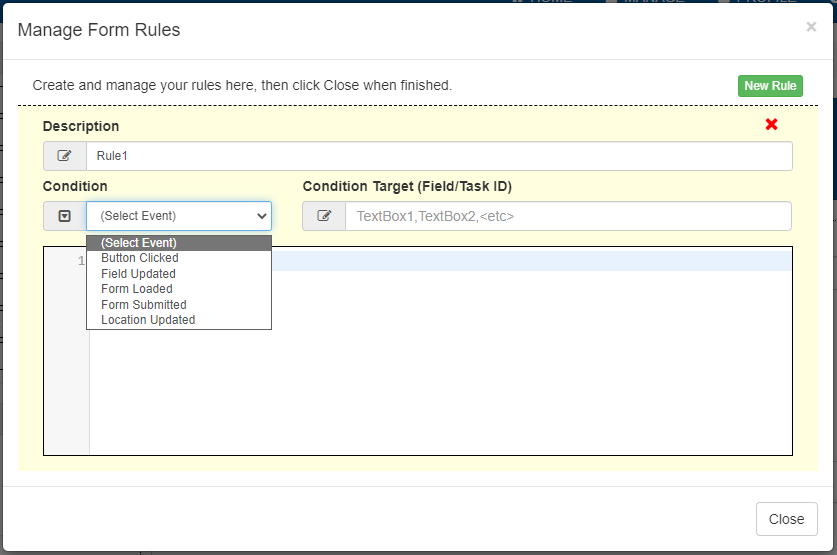
The drop-down on the left which says Select Event allows you to select the trigger events for a rule. There are five types:
Button Clicked: The rule will trigger when the target control is clicked. This is used with Trigger controls.
Field Update: The rule will execute when a targeted control’s value is changed.
Form Loaded: The rule will execute once when the form is loaded. Put a task ID in the condition target, so the rule is only triggered on that flow step.
Form Submitted: The rule will execute when the user submits the form. Put a task ID in the condition target, so the rule is only triggered on that flow step.
Location Updated: The rule will trigger whenever the user’s location changes. Geolocation must be enabled in the form options.
Below the rule trigger fields, there is a code editor. Here is where you enter the JavaScript. It will be able to catch some basic syntax errors with your code, such as variable names and missing semicolons.
Warning
When validating a control’s value, be aware that changing a rule that modifies the target control’s value will trigger the rule again, potentially causing an infinite loop. To avoid this, you can use another control as a flag to indicate that the rule has already run.
/**
* This rule uses a numeric control called "flag" to prevent infinite loops.
* The flag is set to 1 when the rule runs the first time, and reset to 0 on the second run.
*/

valid = isValid(field.value);   // Assume isValid() runs some logic that returns true or false

if (!valid && flag.value == 0) {
    field.value = ""; // Clear invalid field
    flag.value = 1;
}
else{
    flag.value = 0;
}
Environment Variables
In the rules engine, there are several variables that let you get more information about the state of the form and the user.
Below is a table of accessible variables. You can read from these variables using the format of _object.property.
object |
property |
description |
_user. |
name |
The username of the user currently filling out the form. Datatype: String |
authenticated |
Gives a true/false value based on whether the user is logged in. Datatype: boolean |
|
first |
The first name from a user’s profile Datatype: String |
|
last |
The last name from a user’s profile Datatype: String |
|
The mail address from the user’s profile Datatype: String |
||
_form. |
userTaskId |
The step ID of the form. Used for forms in a flow. Datatype: String |
load |
Is when loading finishes. Datatype: boolean |
|
submit |
Is
Datatype: String |
|
_http. |
get(url) |
Performs an http GET on given url and returns the response, can be stored in a var. Datatype: varies |
get(url, username, password) |
Performs an http GET with http authentication on the given url. The result can be stored in a var. Datatype: varies |
|
post(url, data) |
Performs an http POST on given url and returns the response, which can be stored in a var. The data must be a JSON object string. Datatype: varies |
|
post(url, data, username, password) |
Performs an http POST with http authentication on the given url. The result can be stored in a var. The data must be a JSON object string. Datatype: varies |
|
_data. |
rejected |
Whether the form was rejected in the previous flow step. Datatype: boolean |
rejectionMessage |
The reason given by the previous user for the rejection. Null if not rejected. Datatype: String |
Note
The preferred input format for HTTP responses is JSON, meaning any HTTP server that has multiple response types will choose JSON by default.
Note
LDAP domains can use custom user variables, which are accessible like: _user.ldap.[Your Variable Name Here]. See LDAP Management for more on setting up these variables.
Geolocation
After enabling geolocation in the form options, you will be able to use location updates to trigger rules. Also, geolocation allows you to get the user’s location data through the variables given below. All variables will return as a string. Note that geolocation will work in the rules, but for the submission data to capture geolocation data, it must be configured in the system or domain configuration. This product includes GeoLite2 data created by MaxMind.
Warning
Devices without a GPS may give approximate locations, which will cause some of the information to be inaccurate or missing.
Prefix |
Property |
Description |
_geolocation. |
streetNumber |
Provides the street number from the user’s location. |
route |
Provides the street name where the user is located. |
|
streetAddress |
Gives the street number and street name from the users location. |
|
postalCode |
Provides the postal code, also known as the zip code. |
|
neighborhood |
Will provide the neighborhood name from the user’s location, if applicable. |
|
plusCode |
Provides the plus code derived from the user’s, latitude and longitude if applicable. |
|
locality |
Provides the city or town name at the user’s location. |
|
administrativeAreaLevel1 |
Provides the user’s region. For example, in the United States this will provide the state. |
|
administrativeAreaLevel2 |
This will provide another region used in the user’s location. For example, in the United States this will provide a county name. |
|
country |
Provides the country name that the user is in. |
Managing Controls
Each control in a form has a set of properties which can be read and changed with JavaScript. This is in the form of ControlID.Property. For example, most controls where the user can enter data have a ‘value’ property accessed with controlID.value, which can be used like a var in JavaScript. Depending on the control, the values may require different formatting.
Some properties shared by most controls include:
enabled: Can be set totrueorfalse. When set to false, it disables users from being able to manually enter data. This can be used to keep a field only editable by rules or to lock what a user has entered.visible: Can be set totrueorfalse. The control will not be visible to the user if this is set to false. This can be useful to have hidden values stored on the form for later, error messages, or to prevent certain users from seeing certain controls. In the case of containers controls, disabling visibility also hides all the controls contained inside them.label: The display name of a form. Can be set to a string, and HTML markup tags will be applied when viewing the form.
Containers
When a control is in a container, such as a tab, panel, or repeat, the container modifies the functionality of the control.
However, this does not change the access to the control.
In other words, if TextBox1 is inside Panel1, rules can still access the value of it by using TextBox1.value.
Danger
For a text box contained in a panel, this syntax is invalid: Panel1.TextBox1.value.
For the visible, borderless and enabled properties, the property of the container has priority over the control properties.
As an example, if a panel is not visible, neither are the contained controls. Though if the control is set to not visible, it will not be shown even if the panel is visible.
For repeats, the control is instanced on each added repeat panel. Internally, the value refers to the first instance of the control value.
The first value can also be accessed with controlID.values[0]. To access instanced values in repeats, use the control’s values array and the index number controlID.values[idx].
See Repeat for more on how to use repeats and some rule examples.
For more control properties, see the section on Controls.
Using Database Results
As seen in the above properties, it is possible to do http GET and POST commands. You can use HTTP GET commands to communicate with the LiveForms database connector to get data. The response data will be returned in JSON format. You will need to set up the Data Sources before doing these request. To store the result in a variable use a JavaScript line like the following example:
var x = JSON.parse(
  _http.get('http://localhost/liveforms/database/query/<DataSourceName>/<QueryName>?arg1=val1&arg2=val2'));
A particular value can be read using x.resultSet[index].attribute, where index is used as an offset to select a specific row of the resultSet. The first row has an index of 0.
If the database had a column named “email” and we wanted to get the second row, use x.resultSet[1].email to get the value.
You could also assign that value directly to a control:
TextBox.value = x.resultSet[1].email;
Note
URLs only take ASCII characters. If your values have spaces or characters such as (?, /, :, &, @, etc.), you will need to wrap the argument in the encodeURIComponent(arg) method. Example:
var x = JSON.parse(_http.get('http://localhost/liveforms/database/query/<DataSourceName>/<QueryName>?arg1='
    + encodeURIComponent(val1) + '&arg2' + encodeURIComponent(val2)));